How to build a complete notification preference center, powered by Knock and React.
This page covers how to build a PreferenceCenter React component with Knock's preference APIs. This component should be flexible enough to handle most of your needs and can easily be customized or extended for more specific use cases. If you want to reference a TypeScript example, you can find one in the Notion feed example.
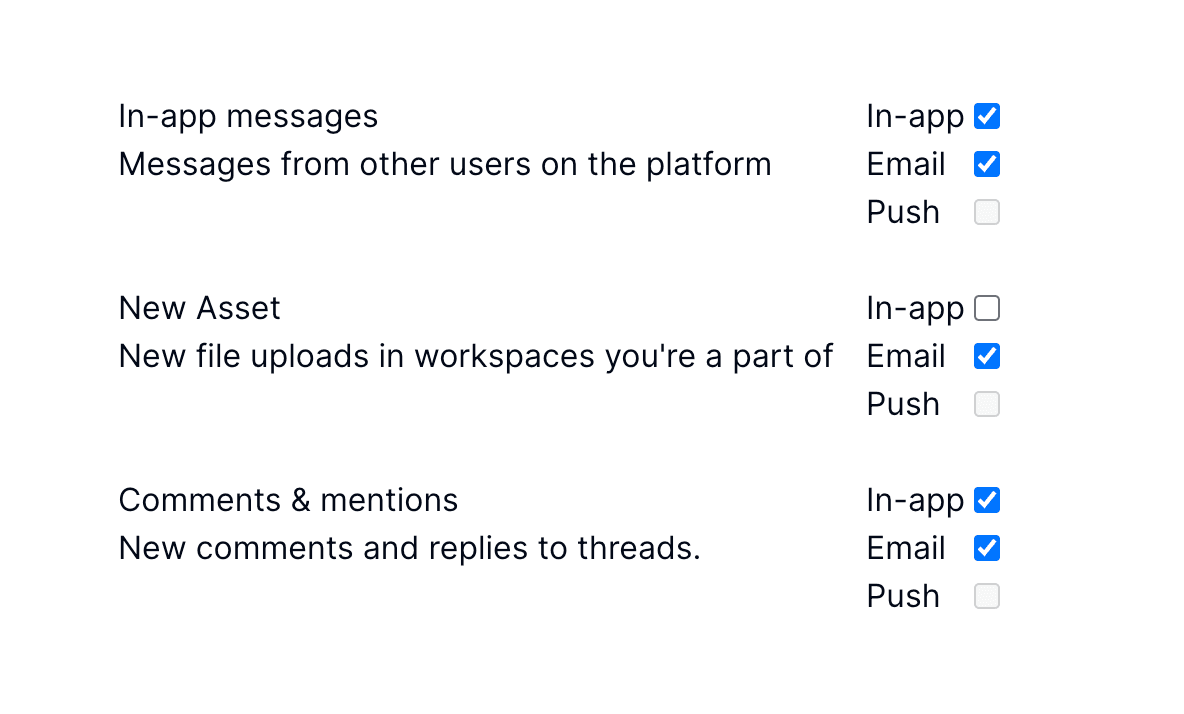
In this example we'll assume the user has a default PreferenceSet that contains workflows and workflow categories, each with it's own channel type settings. We'll expose this to our users as a "cross-hatch" so that they can set a preference for each channel type.
Creating our preference center
#
The next step here is to create our preference center component. Create a PreferenceCenter.jsx file in your project and add the following import statements to the top of the file. After that, you'll need to create a new instance of the Knock client and authenticate it against a user:
In development environments without enhanced security mode enabled, you can omit the second argument (signed user token) and authenticate with the user id alone.
1
Create a preferences view config
Next we'll create an configuration object that will help us drive the view of our preference center. In some cases, you may want to store values in a PreferenceSet that you don't directly expose to users or want to provide more descriptive titles, labels, and descriptions.
In this example, the RowSettings object contains entries that map directly to keys in the PreferenceSet we modeled in the previous step. Each entry here will surface those settings to the user and provide additional human readable details with title and description. If you want to modify this for your own project, you can swap the keys inside of RowSettings with a key from your default PreferenceSet and update the title and description properties.
The ChannelTypeLabels object is similar in that its contents determine which channel type settings will be surfaced for each row. Adding additional entries to this object will present more checkboxes for the user, and you can modify the label value by updating the value of a particular key.
Copy and paste this PreferenceViewConfig object in your component file and make any updates to correspond with the shape of your default PreferenceSet and channels.
2
Display a preference setting row
Next, we'll create a PreferenceSettingsRow component that will display the title, description, and checkbox toggles for each SettingsRow entry:
This component has a lot of functionality built in, so let's unpack what it does.
Using the preferenceKey parameter, this component renders a section of UI that displays the title and description properties stored in the PreferenceViewConfig under the matching key:
Next, we'll generate an input element tied to each channel type setting for that preference. We do that by looping through the keys of PreferenceViewConfig.ChannelTypeLabels to generate a UI element tied to a particular channel and preference setting:
This section of UI uses the channelTypeSettings passed into the function to drive the disabled and checked states of the input element. These channelTypeSettings are the user's existing preferences pulled directly from Knock. By disabling the checkbox if those channel type settings are undefined we remove the user's ability to modify that value if it doesn't appear in the default preference set.
As the user toggles the state of this input it fires an onChange event handler that calls a function also passed as a parameter. This function is ultimately what updates the user's preferences in Knock, so we pass a modified value of channelTypeSettings that includes the current value of the event target's checked property:
3
Render your preference center
Now that we have a PreferencesViewConfig object to help us drive the shape of our UI and a PreferenceSettingsRow to render a row's details an the necessary inputs, it's time to compose those elements into an actual PreferenceCenter component. This PreferenceCenter function should be exported:
Let's examine the code in the PreferenceCenter component step-by-step to explain what's happening.
First, we need to load the current user's preferences from Knock and store them in local state so we can operate on them. We can call the getPreferences method on knockClient.user to load a user's preferences:
Next, we create a function called onPreferenceChange that will get passed as the onChange parameter to our PreferenceSettingsRow component from the previous step. The onPreferenceChange function takes a preferenceKey argument and an updated channelTypeSettings argument:
Based on the preferenceType of the update, we'll overwrite any existing preferences stored under that key and use the setPreferences method of knockClient.user to update those preferences in Knock. We then set the updated preferences back to local state using setLocalPreferences to keep our UI in sync with what is stored in Knock.
Lastly, we actually render our PreferenceSettingsRow components:
Here we loop through each workflow or category key stored in a user's preferences and pass in the existing channelTypeSettings which will power the state of that row's checkbox inputs and the onPreferenceChange callback to update a user's preferences in Knock.
You should now have a working preference center 🎉
Completed preference center
#
Knock's preference model is very flexible, but you should find that the component below will satisfy most of your preference center needs and can easily be used as a starting point for your own preference center.