Fetch function
Learn more about the fetch workflow function within Knock's notification engine.
A fetch function executes an HTTP request as a step in a workflow. Any data returned to a fetch function is merged into the original trigger data provided on workflow trigger and made available to all subsequent steps in the workflow.
With the fetch function, you can acquire additional data for your channel step templates that may not be immediately available when you first trigger a workflow. A common case is combining a fetch function with a batch function to retrieve trigger data for a group of activities after a batch window has closed. You can also use the fetch function to trigger side effects in your systems as Knock processes your workflow.
Building a request
#As with channel steps, you use the Knock template editor to configure the shape of your request. For each fetch step, you can edit the following attributes:
- Request method - You can select one of GET (default), POST, PUT, DELETE, or PATCH.
- URL - A valid HTTP URL.
- Headers - Any headers Knock should include in the request. You manage these via a key-value editor, with the key being the header name and the value being the header value.
- Query parameters - Any query parameters to encode into the URL. You also manage these via a key-value editor.
- Request body - When building a POST or PUT request, you can build a request body to include in the request. Knock will always encode the request body as JSON.
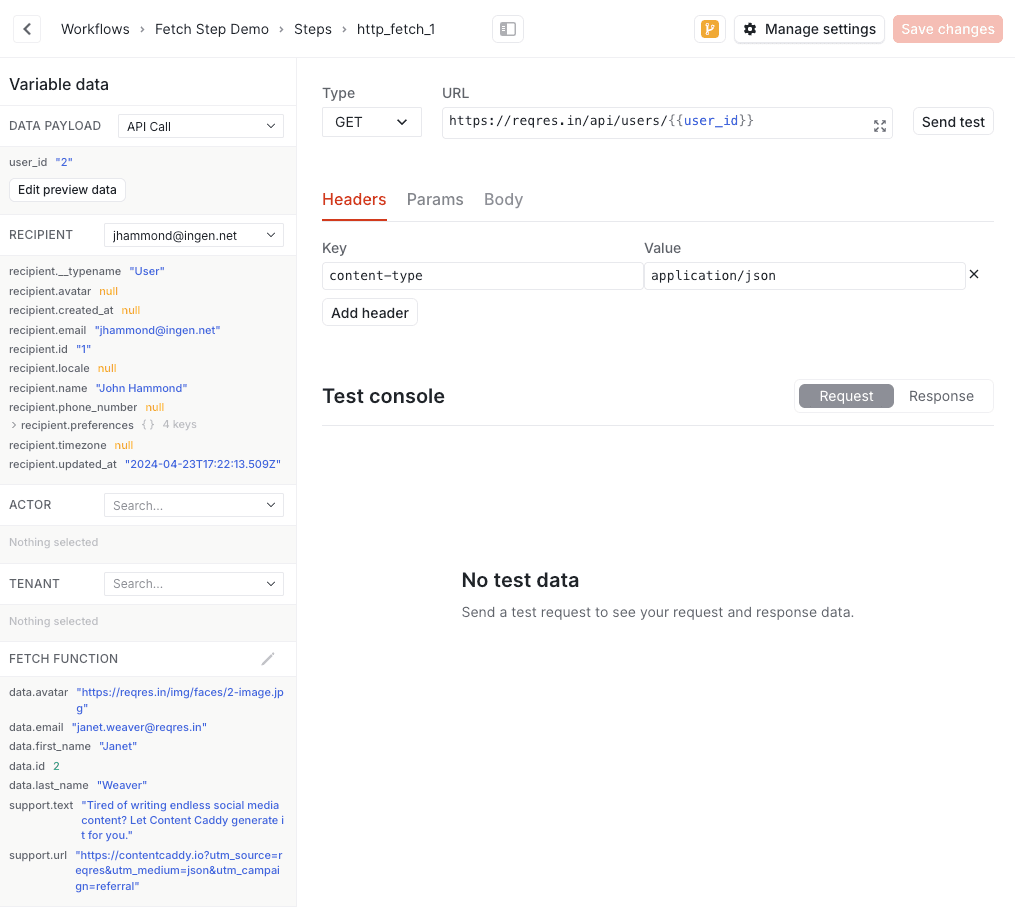
Using the request template editor to configure a fetch function.
Aside from the request method selector, each of the above fields is a Liquid-compatible input. This means you can use Liquid variables and control flow to inject variable data, access Knock-controlled workflow state attributes (e.g., recipient), and dynamically shape the request per workflow run.
See the Knock template editor reference for detailed information on working with Liquid templates in Knock.
Request execution
#When executing the request for a fetch function, Knock expects the following from your service:
- The response to the request is one of:
200 OK,201 Created, or204 No Content. - If the request response contains data, it's encoded as JSON and can be decoded into a map/dictionary/hash.
- The response to the request takes no longer than 15 seconds for Knock to receive.
Merging data
#When the response sent to Knock for a fetch function request contains JSON data, Knock will merge the decoded result into the data you originally passed to the workflow trigger call. Knock uses a shallow-merge strategy here where:
- Data from the request overwrites the original workflow run data.
- Top-level attributes are merged, and nested attributes are completely overwritten.
The merged data result from a fetch function step then becomes the global trigger data for all subsequent steps in the workflow run.
The example below illustrates how this could look in practice.
Specifying the Response Path
#You can specify where in the trigger data the response from the fetch step should be placed. To do so, click on "Manage Settings" from the fetch step within your workflow template editor. From there, you can specify the response path.
The response path can be any string. To create nested keys within the trigger data, use dot (.) notation. For example, specifying foo.bar will place the response under the bar key within the foo object.
Error handling
#Knock will automatically retry request execution for a fetch function following certain types of errors. The first retry will be delayed by 30 seconds, and the second by 60 seconds. These retryable errors are:
- Server errors - Any
5xxlevel HTTP error code. - Request timeouts - This is any fetch function request from Knock that does not receive a completed response within the 15 second limit.
All other errors or unexpected responses are immediately fatal. These include:
- Any other HTTP response code.
- Some issue with the structure of the request, such as an invalid URL.
- Any issue JSON-encoding a request body.
- Response data that cannot be JSON-decoded as expected.
After two failed retries for a retryable error or any non-retryable error, Knock will mark the fetch function step as a failure and halt your workflow run.
Testing fetch functions
#As you develop, you can execute test runs of your fetch step from right within the template editor. This should look and feel similar to executing test runs of your workflows, but here Knock will execute just your fetch step, ignoring any other steps that may exist before or after.
To run a fetch step test:
- Click the button that sits to the right of the URL field in the template editor. This should open the Knock test runner modal.
- Specify the appropriate trigger parameters (actor, recipient, trigger data, and tenant) for the test run. NOTE: If your fetch step expects data from a preceding batch step or fetch step, you'll need to explicitly include it here in the "Data" field. Since Knock will test this step in isolation, it cannot know what preceding data may be present when the full workflow runs.
- Click the "Run test" button in the modal. The modal will close and the test console should display a loading state as Knock executes the test.
- When the test run has completed, Knock will load the result into the test console for your review. You can then use use the "Request" and "Response" buttons to toggle between the two views in the test console. The "Response" section will show any data returned by the request that would be made accessible to subsequent steps in your workflow.
When running fetch step tests, Knock will not retry a failed request on any error. For the retryable errors outlined above, Knock will indicate in the test console result that they would be retried during a full workflow run.
Debugging fetch functions
#You can use the workflow run logs to debug your fetch function steps. For each fetch function, you can expect to see in the logs:
- The request URL (with encoded query parameters), headers, and body as sent by Knock.
- The duration of the request (in milliseconds).
- The response headers and body data.
In the workflow run overview, you'll also see any data that Knock successfully received from your fetch function steps and merged into your workflow run state.
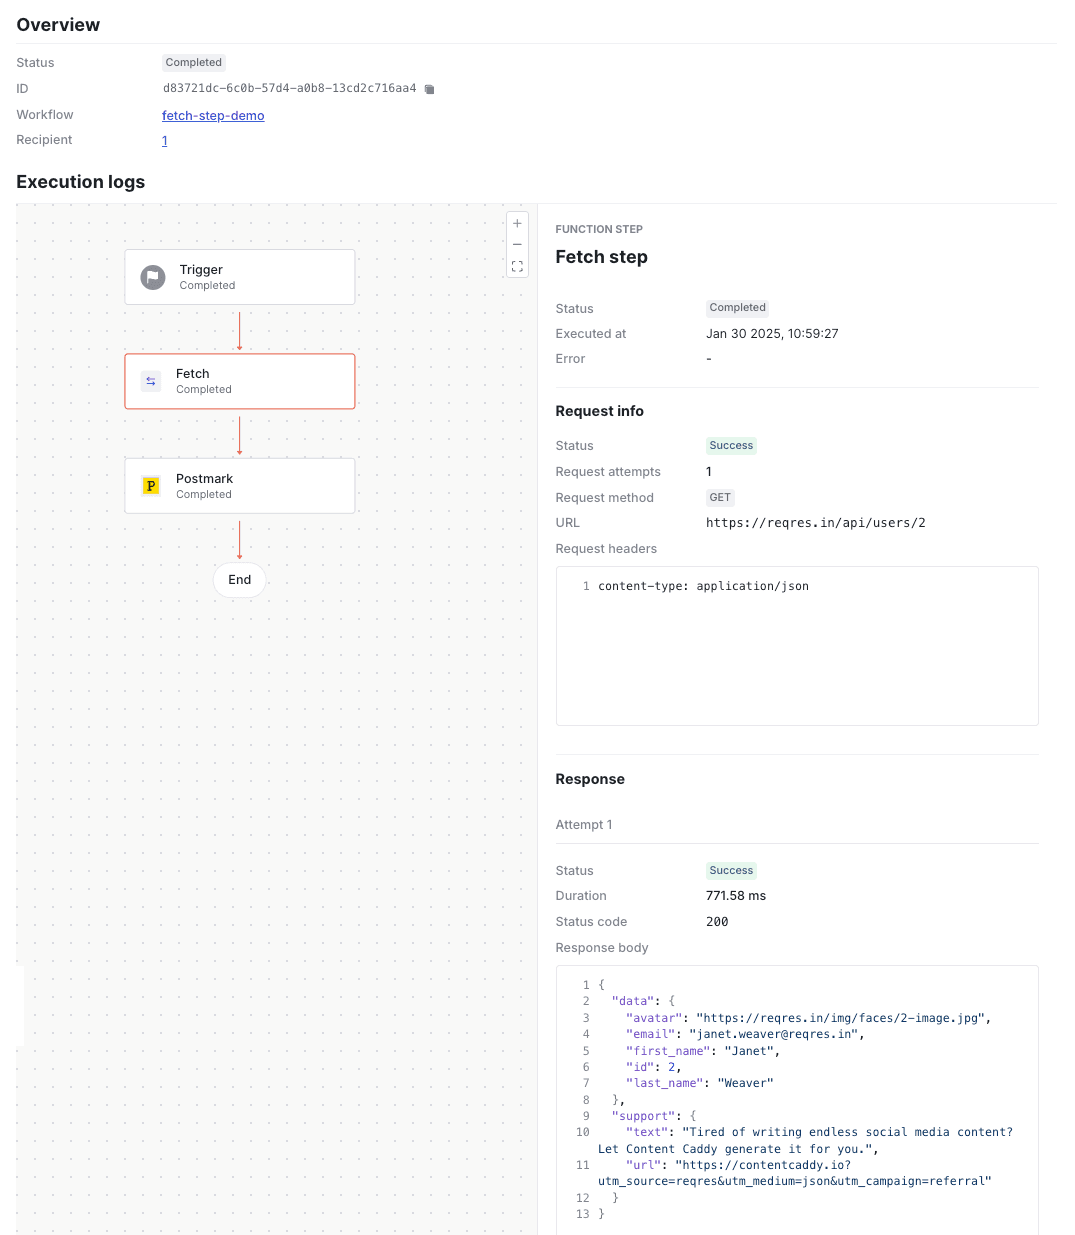
Viewing log details for a successful fetch function step.
If the request encounters an error, you can also expect to see details about the error in the logs. And finally, if the fetch function retries the request on a retryable error, you can expect to see details enumerated for each request attempt.
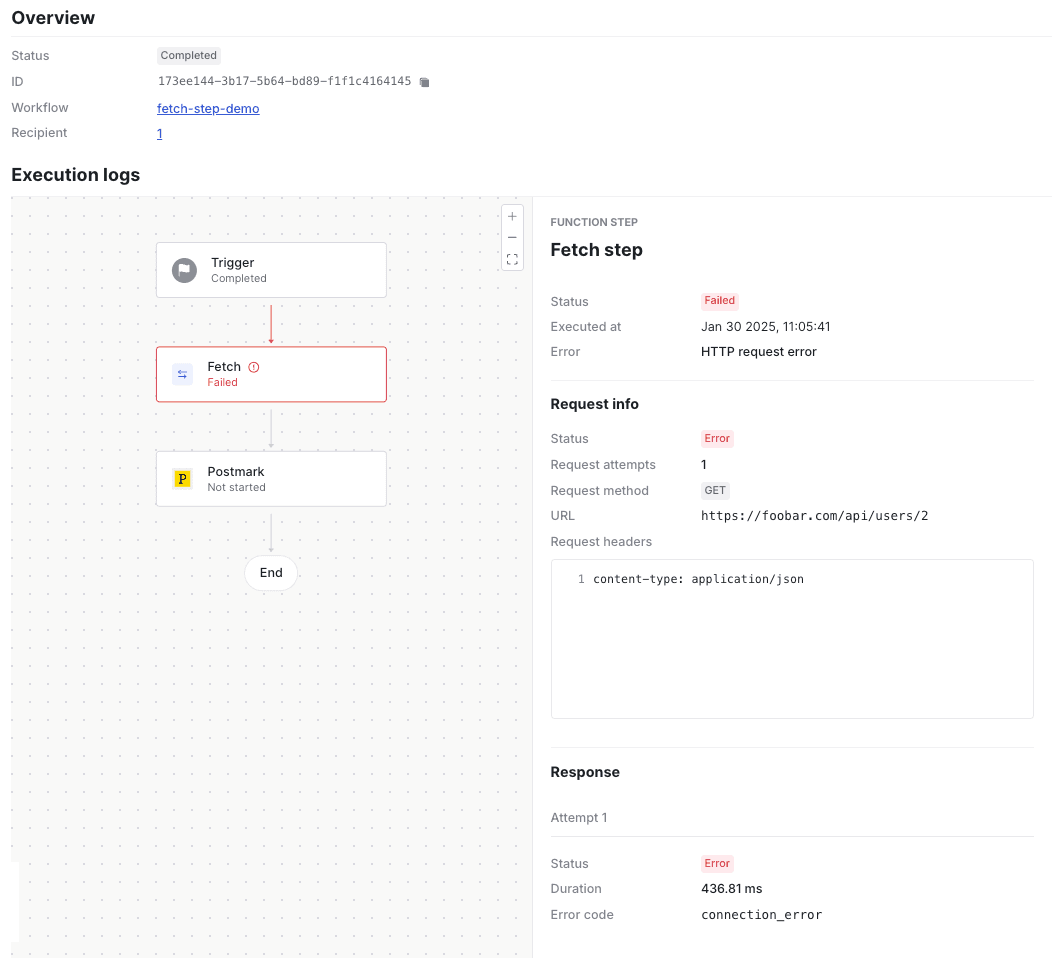
Viewing log details for an unsuccessful fetch function step.
See the documentation on debugging workflows for more details about workflow debugging and run logs.
Securing fetch requests
#Adding security to your fetch requests guards your endpoint from the outside world. There are currently two options to do this within Knock: using authentication headers, or adding request signing.
Adding authentication via headers
#One option for adding authentication is to use a shared secret between Knock and your service's endpoint that you inject into the headers of the request. You can use our secret variables to create and store this secret within Knock, ensuring that it can be unique per environment and also obfuscated within the dashboard across all usage.
Variables can be accessed under the vars namespace in liquid. To add a secret into a header you use the syntax {{ vars.your_variable_name }} in the header value field.
Adding request signing
#Another option is to enable request signing, which will sign the request against a signing key that Knock generates and that can be used to guarantee that the request is coming from Knock.
You can enable request signing for the fetch function by going to the "Manage settings" modal in the top right corner when editing the request template. Once you enable request signing, Knock will generate a signing key that will be used to sign the request. This same key can then be used within your application to verify the request came from Knock via a signature added to the request as a x-knock-signature header.
Verifying the signature
The signature is generated with an HMAC using the SHA256 algorithm and, before being encoded, is comprised of the timestamp and the stringified JSON payload of the request. We encode "timestamp in numerical form"."stringified payload" as the signature of the request.
The x-knock-signature header is a string comprised of the timestamp used in the encoding and the encoded value above. It will look like this: t=timestamp,s=encoded-signature
To test that the payload sent has not been compromised, you can recreate the signature using the shared secret key and compare to the one sent in the header.
-
Split the
x-knock-signatureon the comma (",") and extract the values of timestamp and signature. -
Construct the value of the signature by concatenating:
- The timestamp (as a string)
- The character
. - The stringified JSON payload
-
Generate the signature with an HMAC and SHA256 algorithm using the signing key from the fetch function.
-
Compare your generated signature with the one extracted in step one; they should match exactly. If the timestamp is more than five minutes old compared to the current time, you may decide you want to reject the payload for additional security.
Reusable fetch functions
#An overview
#Knock allows you to create and save request configurations so that your team can reuse them as instances across multiple workflows. Updates to these requests cascade down to their instances, making it possible to centrally manage configurations. Reusable requests are a versionable resource in Knock.
Creating a reusable request
#To create a reusable request, navigate to the Reusable requests page in the Knock dashboard from the main sidebar. Then, click the "Create reusable request" button. After creation, this will take you to the function editor where you can specify the details of your function.
Once the request is created, save and commit the configuration.
Optionally, you can define request inputs for the reusable request so each workflow instance can supply its own structured values while sharing the same HTTP configuration. See Define inputs later on this page.

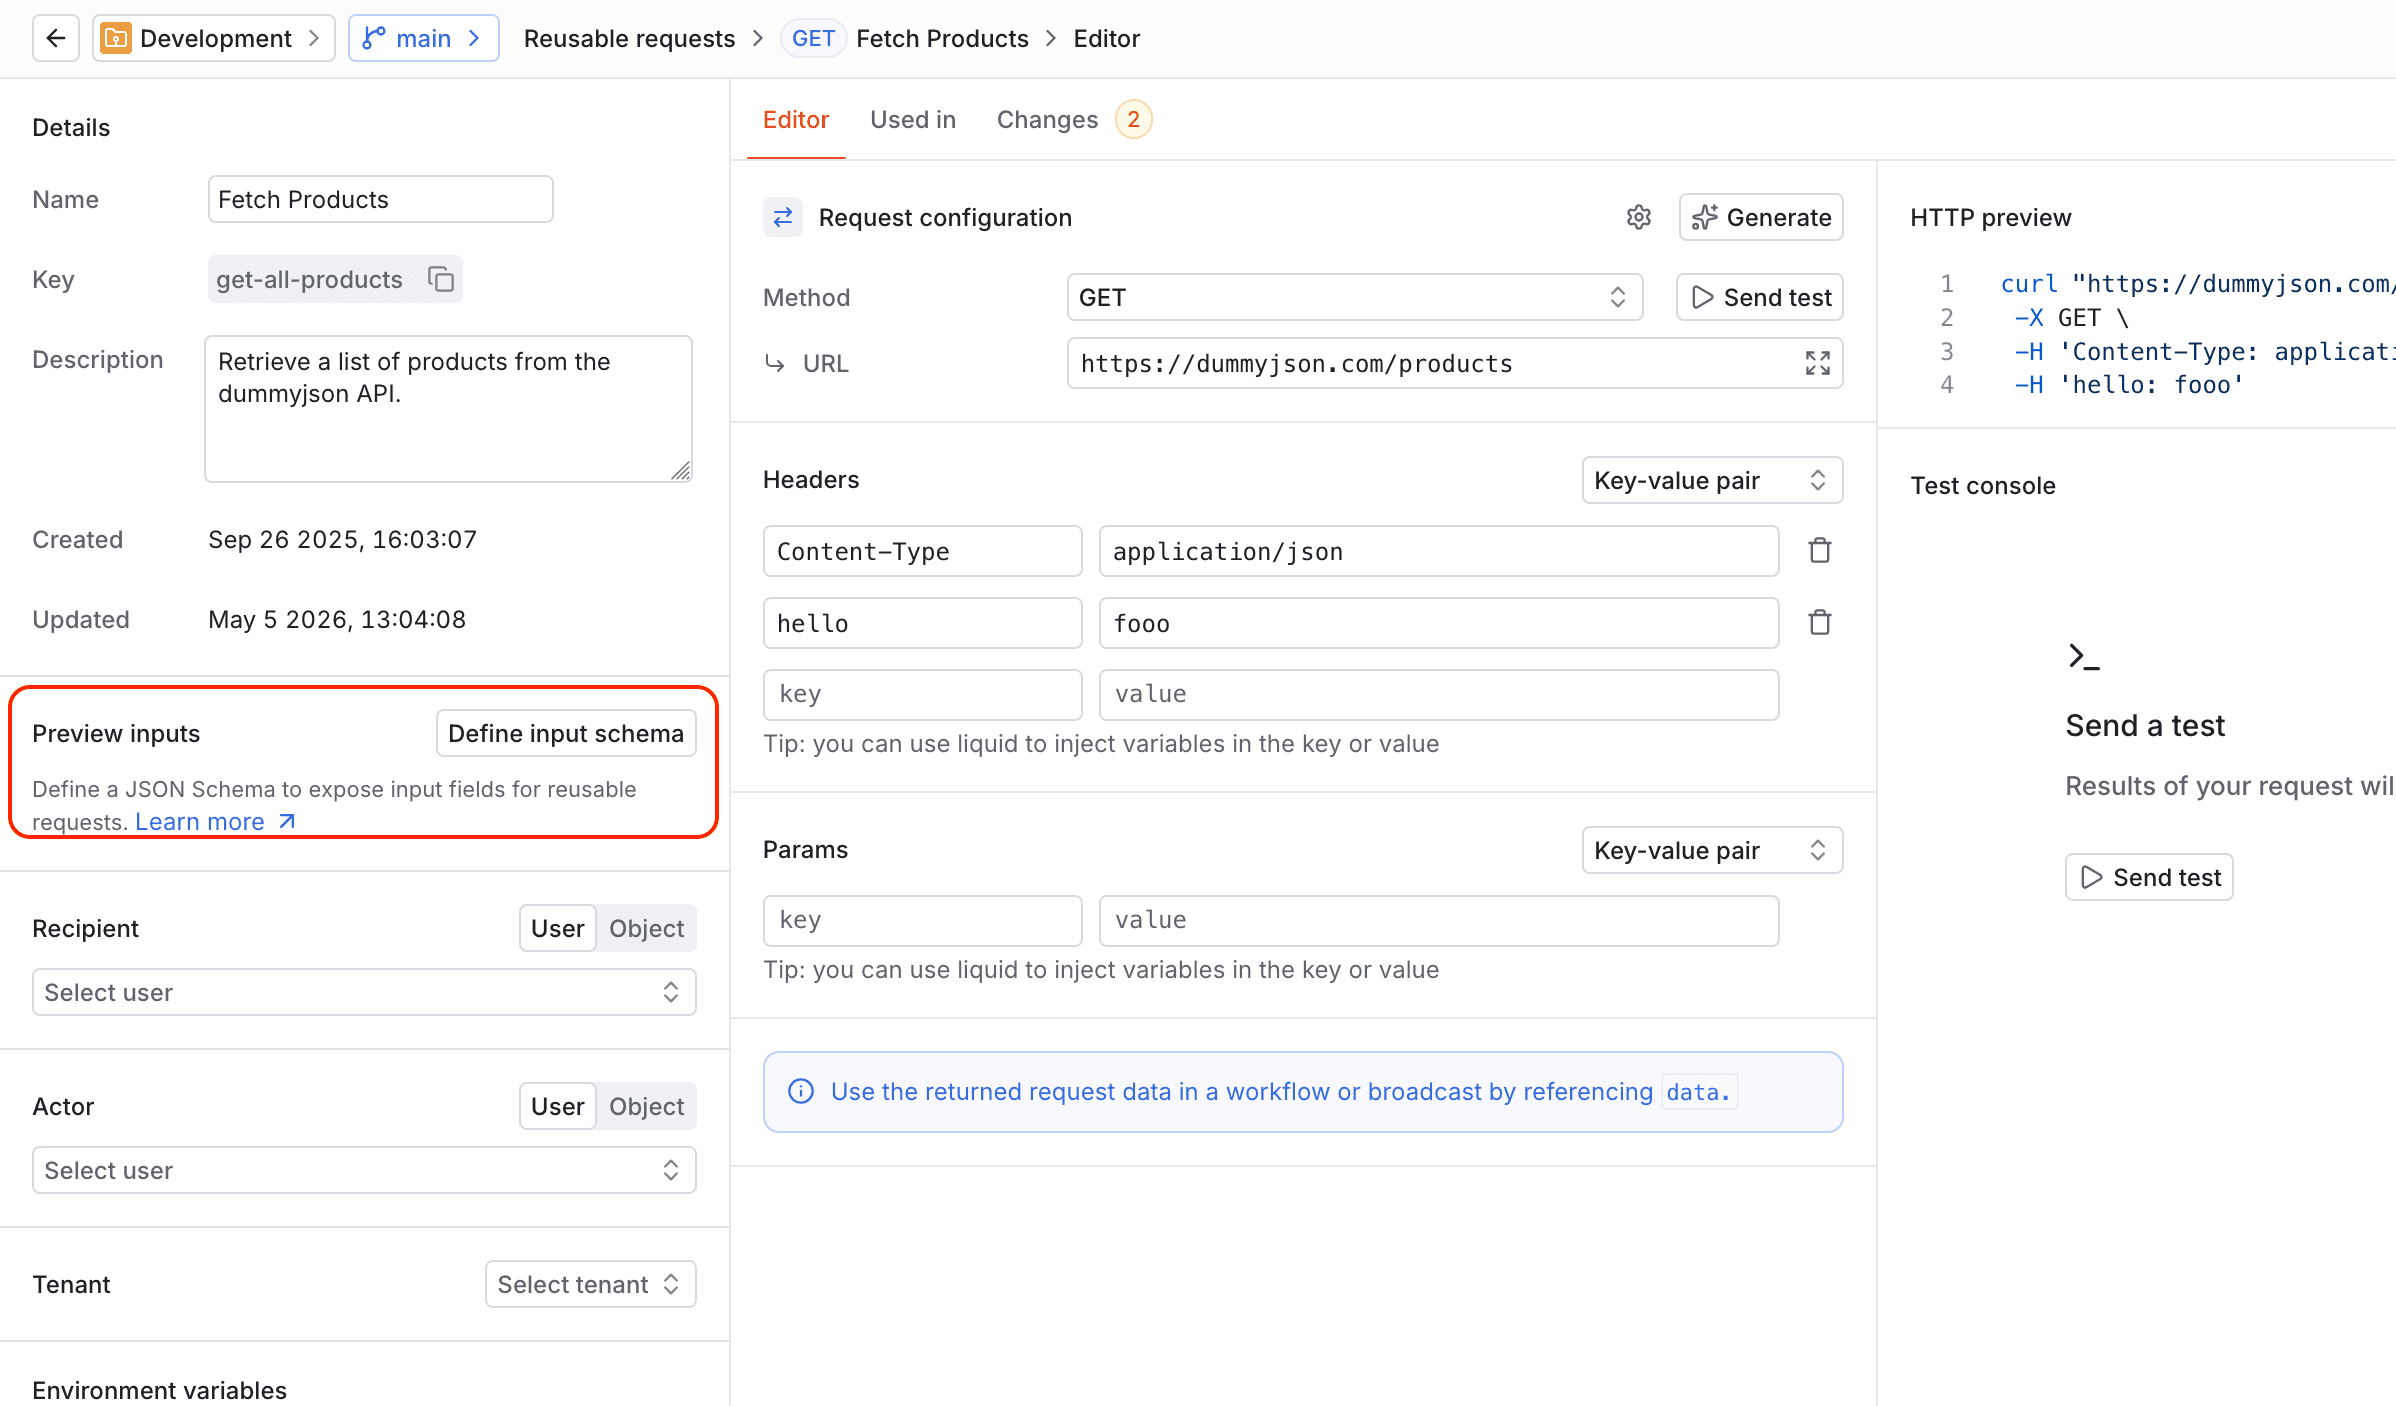
Creating a reusable request in the dashboard editor.
Using a reusable request
#


Define inputs
#Reusable requests can declare an input schema so team members know what parameters are available to them when using the request in a workflow.
Input schema
#On the reusable request, input schema is a JSON Schema object that describes the allowed input properties (types, required fields, default values, and so on).
To define a schema, navigate to the reusable request editor and click "Define schema" on the left side.
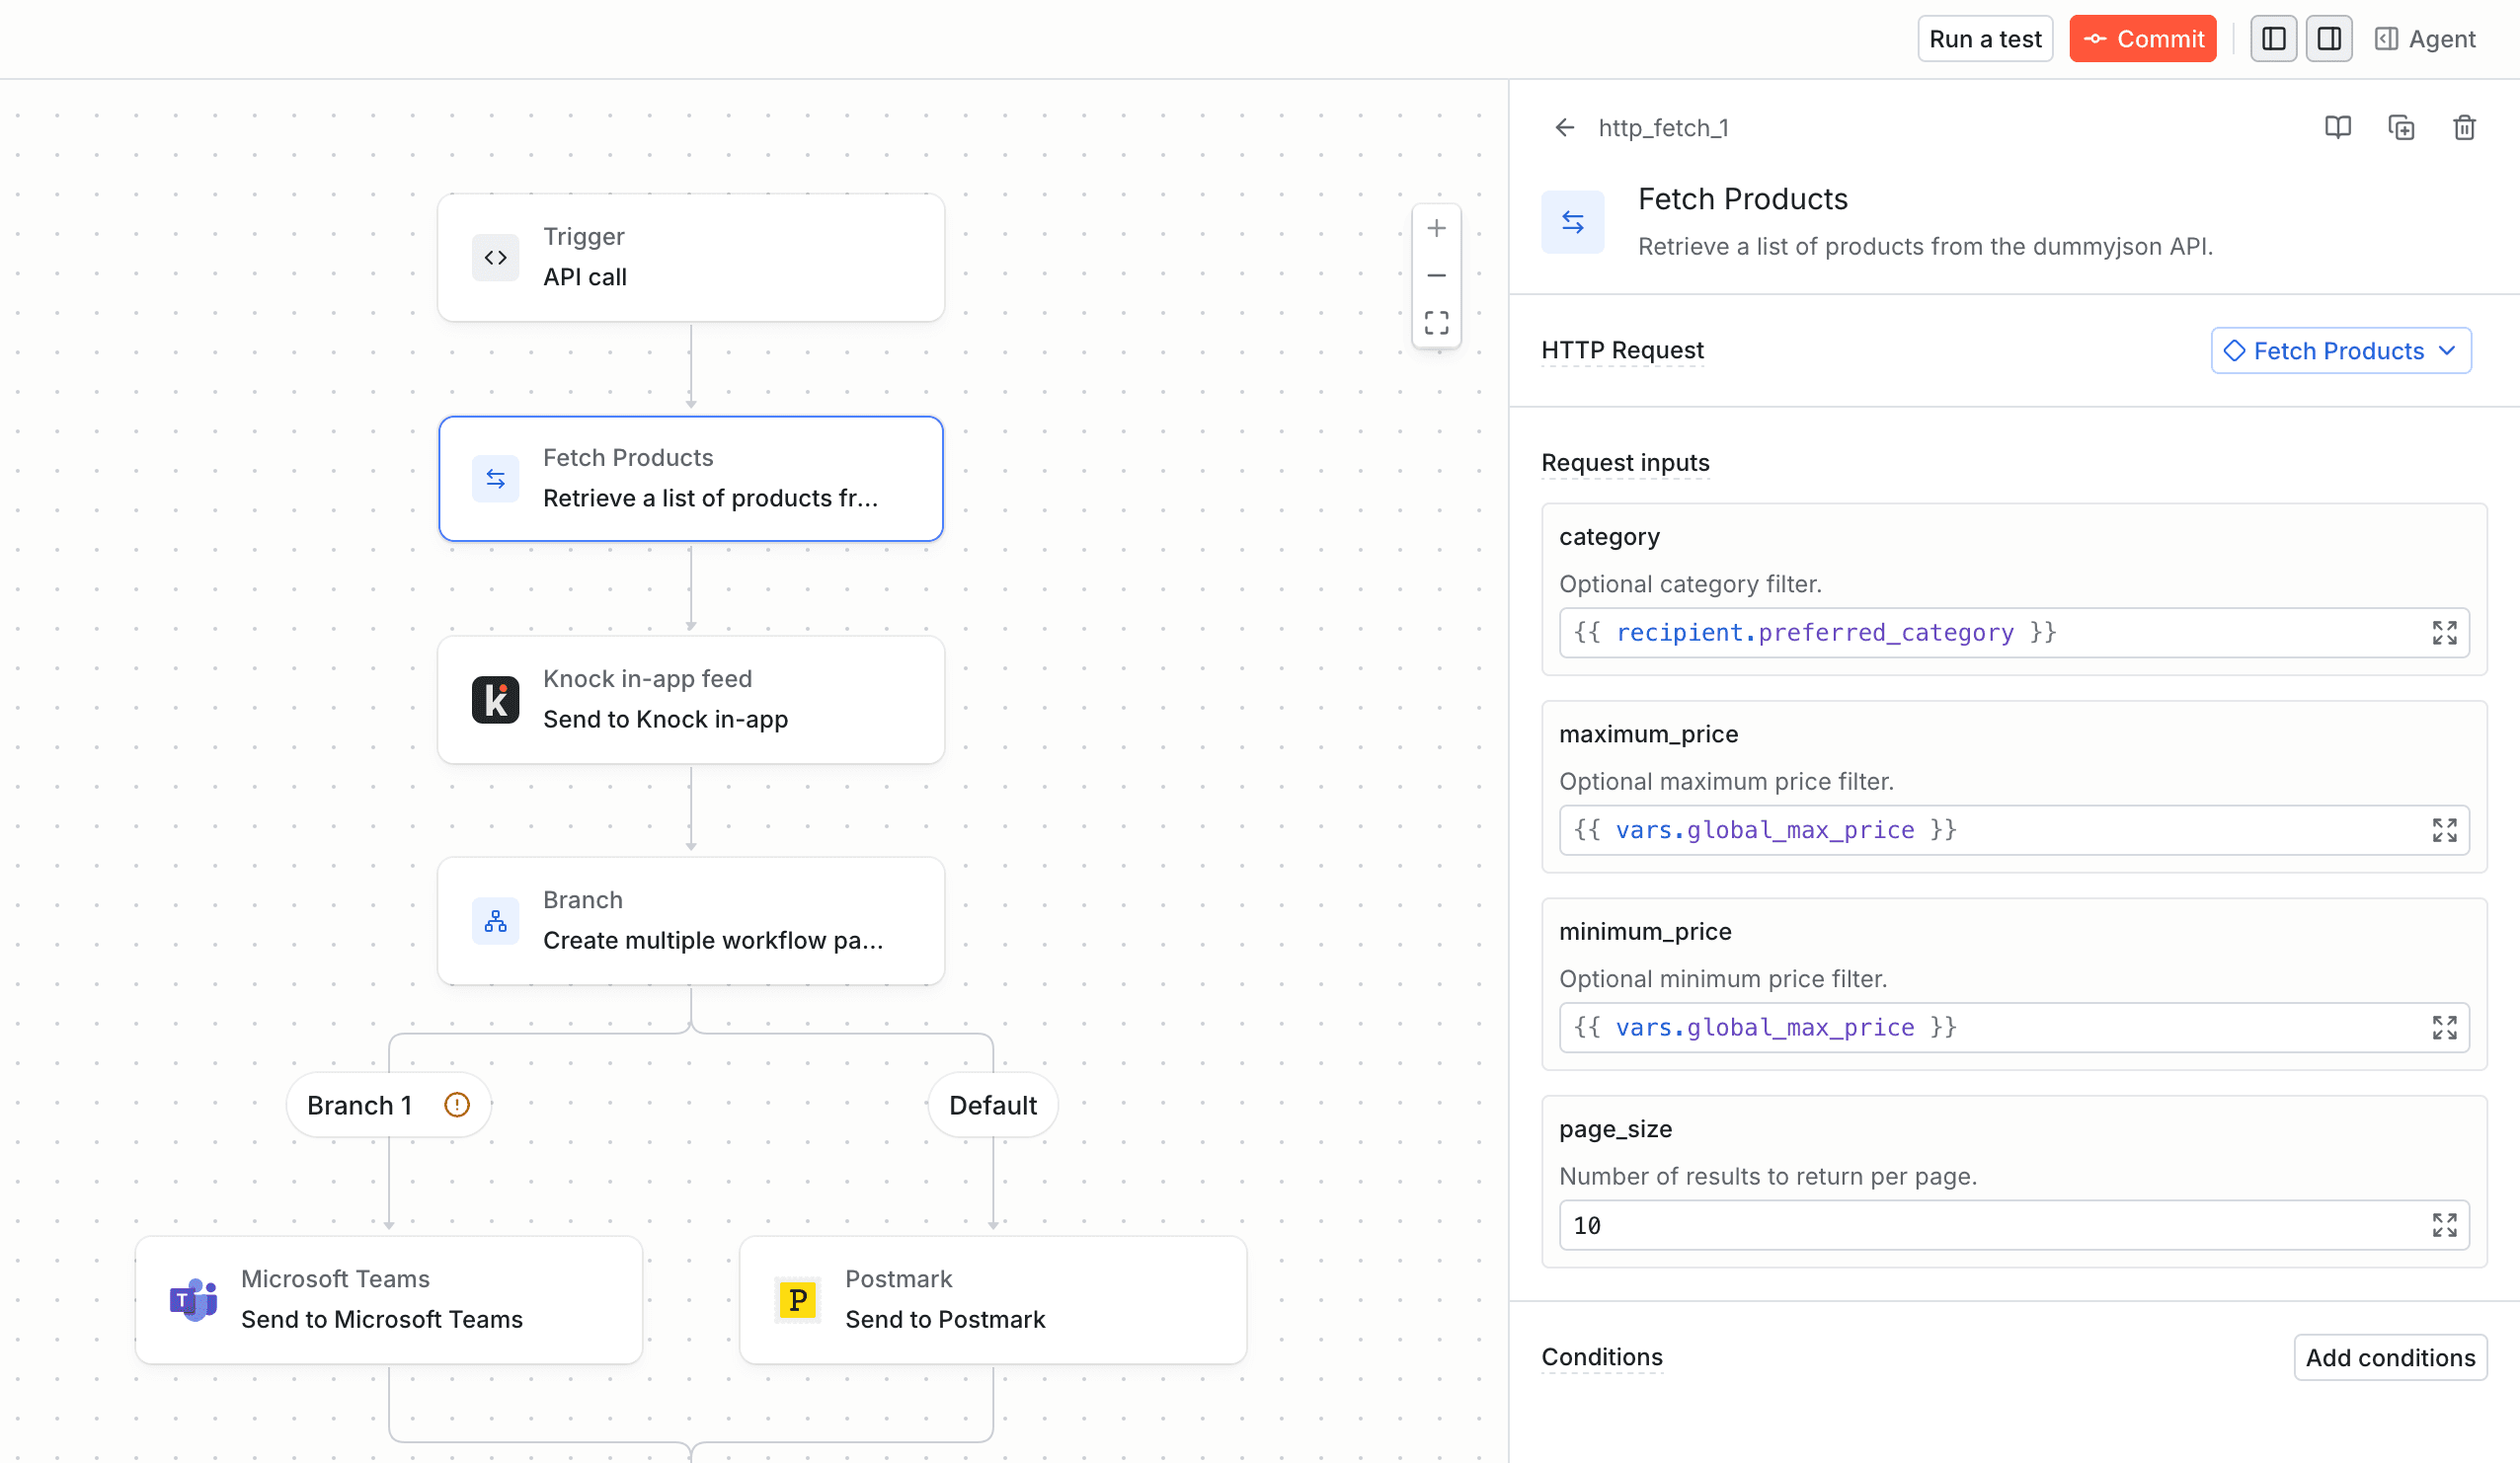
Workflow usage
#When a schema is present, the dashboard will render structured input fields on linked fetch steps inside the workflow editor. These input fields support Liquid syntax and are unique per workflow run, so they can target all available variable fields like recipient, data, actor, and vars.
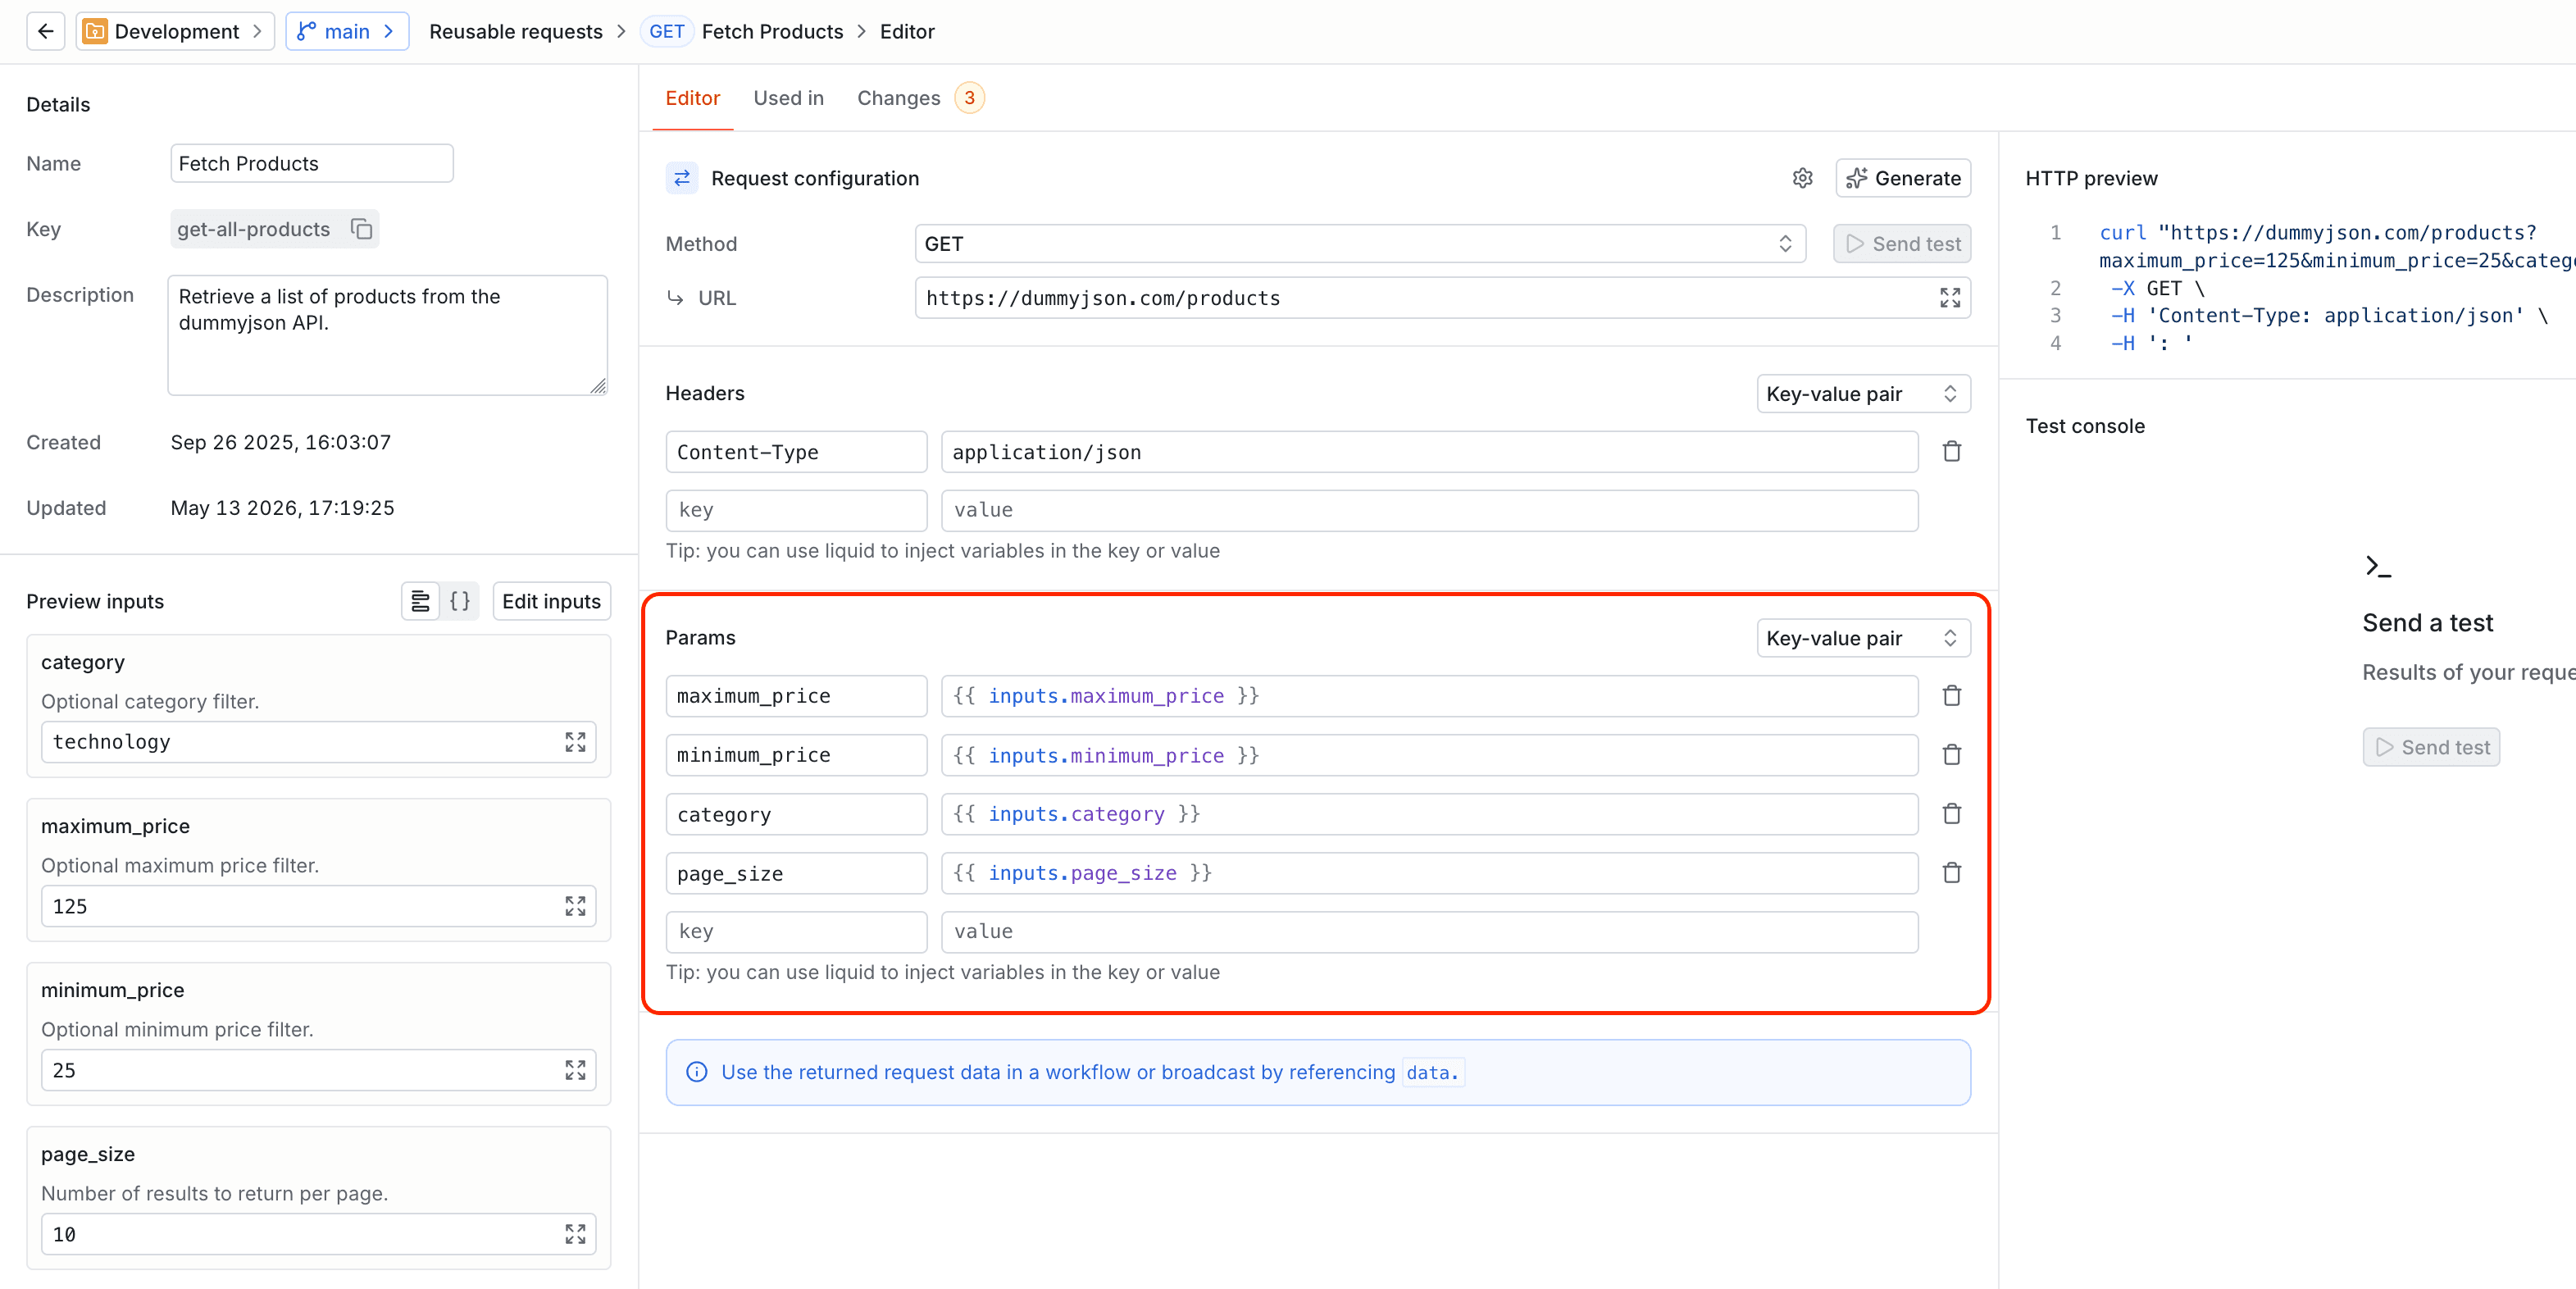
Preview inputs on the reusable request
#On the reusable request itself you can set preview inputs. These values are used when you preview or test the reusable request in isolation from a workflow.

Using values in the request template
#Knock resolves values for the fetch step and merges them into the Liquid scope for that step under inputs. Reference them in the URL, headers, query parameters, or body like any other variable—for example {{ inputs.order_id }} alongside {{ recipient.id }} or fields from trigger data.
Making changes to a reusable request
#If you need to make changes to the request, it's recommended to edit the underlying request itself via the "Reusable requests" page, that way changes will apply to all instances of the request.
However, if you need to make changes to a single fetch step request, you can click the "Detach instance" button from the dropdown to remove the reusable request usage, and enable an editable state.
Versioning
#Reusable requests are environment-specific, so you can safely edit a request in one environment without affecting production workflows. To use a request in a different environment, make sure the request is committed and promoted to the environment you want to use it in.
Read more about versioning in Knock here.