Email layouts
Learn more about how to use layouts with your email templates in Knock.
In this guide we cover how to use email layouts and templates in Knock to send great looking notifications to your users.
An intro to email layouts and templates in Knock
#When you use Knock to power your email notifications, you use two main concepts to build the notifications that will be sent to your users: layouts and templates.
The layout typically includes the header and footer of your email, as well as any other HTML or CSS that will be used across all (or multiple) templates. You can think of your email layout as the "frame" of your email notifications, where you define the shared structure and styles once for all your email notifications so they can look and feel consistently without having to repeat them in every template.
The template is the actual body and content of your email. When you add an email step to a workflow, the content that you edit within the template editor is the template that will be wrapped by the layout mentioned above. Under the hood, Knock is injecting this template into the {{content}} variable of the email layout.
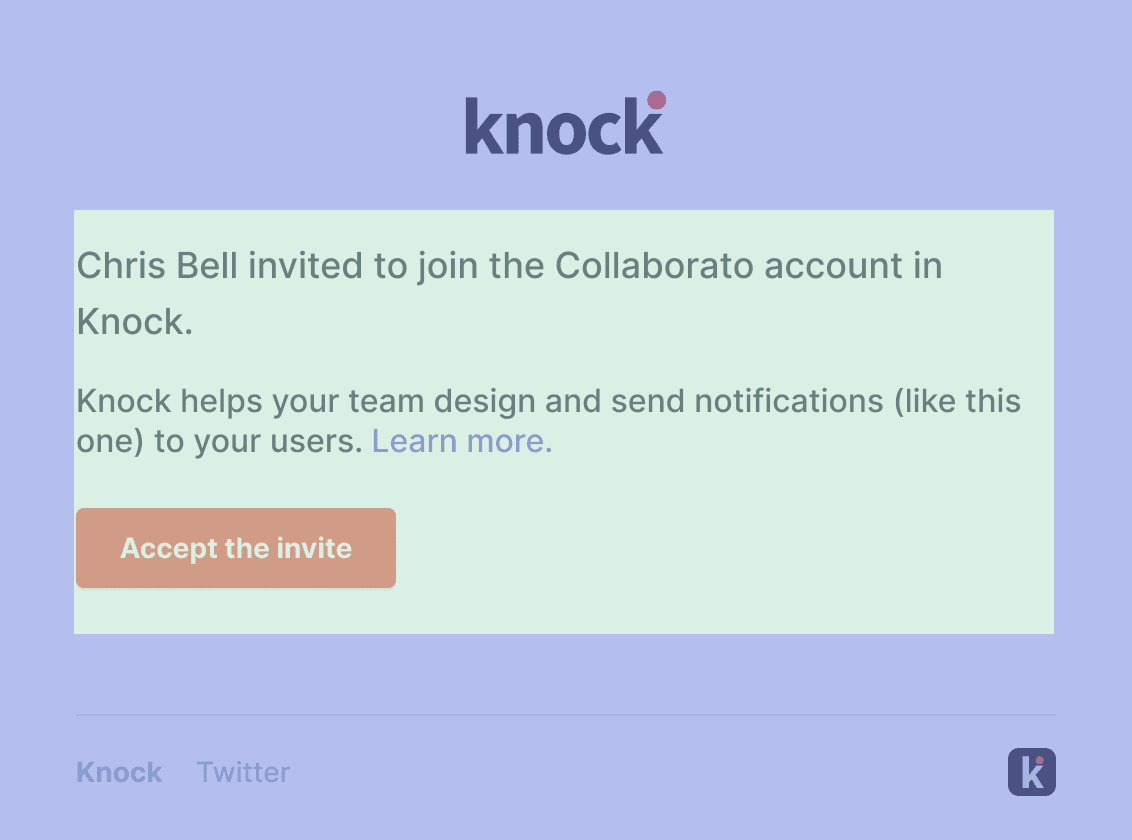
Here's an example of a transactional email we send at Knock, complete with the template content merged into the layout. The area shaded in green is the template. The area shaded in blue is the layout.
Here's a quick overview of the system-level variables Knock provides for use in your layouts.
The Knock default layout
#Your Knock account starts with a pre-built default layout. If you navigate to Developers > Layouts in the sidebar of your Knock dashboard, you'll find this default layout. This default layout will be used by all new email templates when they're initially created, so if you want to change the default layout used by your emails, this is the one to update.
Click on the "Default" layout in your layouts list to enter the layout editor. You'll start by looking at the pre-built layout that Knock gives you out of the box. You'll find a footer design option in this visual builder where you can add footer links to this pre-built layout for HTML emails. You can update the logo, icon, and brand color of your email layout by going to Settings > Branding and updating these attributes.
If you'd rather create your own layout from scratch, you can click "Edit in code editor" in the top right corner of the layout editor to enter our custom layout editor. You can learn more about custom layouts in the custom layouts and styling section of this guide.
Every layout includes the text layout for plaintext emails, and the concept works the same as the HTML layout where the text content of your email template will be injected into the {{content}} variable. Click the "Text" tab to switch to the text layout, and edit it as you see fit.
Selecting a layout for a given email template
#All new email templates created within workflows will use your default email layout. If you would like to use a different layout for a specific step, open the template editor, click the gear icon (⚙️) to access the template settings, and select your preferred layout from the "Email layout" dropdown in the modal. After saving, you can use the preview pane on the right side of the editor to see how your template will render with the selected layout.
If you'd like to create an email step in your workflow that contains the full HTML document at the template level (without a layout wrapper), you can select "No layout" in this dropdown.
Custom layouts and styling
#If you want to create your own custom email layouts, you can go into the layout editor and click "Edit in code editor" to go to an HTML and CSS editor for your email layout. The important thing to remember here is that your layout needs a {{content}} somewhere in its body tag for the email template to be injected into the layout.
Creating new layouts
#To create a new layout, go to Developers > Layouts and click "Create layout." All new layouts start in Knock's visual layout editor, but you can override this default by clicking "Edit in code editor."
Using custom fonts
#Knock supports custom web fonts that are referenced inside your email layout's <head>. This should be done via a <link> tag, as the style @import rule is not supported:
Because many widely-used email clients do not support web fonts, we highly recommend choosing a web safe font as a fallback when using custom web fonts to ensure a consistent user experience.
Using variables and brand attributes in a custom layout
#It's helpful to remember that you can use variables you create at the account and environment-levels by injecting them into your layout with the vars.* namespace. This is a great tool for global values that will be the same across all emails you send, such as base URL for embedded links in your email notifications.
You can also use the vars.branding.* namespace for injecting the branding properties you set in account settings. The following branding properties are available for use in custom layouts.
vars.branding.logo_urlvars.branding.icon_urlvars.branding.primary_colorvars.branding.primary_color_contrast
If you use per-tenant branding, remember that Knock automatically evaluates these properties and shows the relevant branding elements based on the tenant_id associated with a given workflow run. As an example: if I trigger a workflow that includes a tenant_id with custom branding elements set on their tenant, the layout will use those branding elements. If no custom branding elements are set on the tenant, then the account default branding elements will be used.
Injecting workflow run scope into a layout at runtime
#If you have a workflow-run-scoped variable that you'd like to inject into your layouts, you can do so with normal liquid variable injection, so long as the variables come after the place in your layout where {{content}} is first rendered. (If you need to inject variables into your layout above your {{content}} variable, see the "Defining pre-content variables" section below.)
As an example, let's say my email template is using the Liquid capture tag to create a variable called formatted_price within the email template. If I want to inject that formatted_price value into the footer of my layout, I can do so by using the {{formatted_price}} variable in the footer of my layout file.
Defining pre-content variables
#When the Knock notification engine sends an email notification, it compiles your email template with its selected layout to create a single email template that is sent to your recipient.
In this process, the templates that you define in your email channel steps are injected into the {{ content }} tag in your email layout.
In cases where you want to inject a template-level variable above the {{ content }} tag of your email layout, you can set pre-content variables to inject variables into your layout above where your {{ content }} tag will render.
To set pre-content variables for your template, open the email template editor, click the three-dot menu in the top right corner and select "Manage template overrides." You'll add your pre-content variables to the pre-content field using liquid syntax.
You can use pre-content variables to:
- Declare any template-specific liquid variables to control or dynamically alter parts of your email layout without needing to create separate email layouts.
- Declare any template-specific liquid variables for use throughout your email template in a single, clear location.
Including preview text
#Knock allows you to set custom preview text for any email template which is displayed by most email clients. To enable this, your email layout must include the {{ preview_text }} slot before any other content. Once your layout includes this slot, you can set the preview text for any email template in the template editor.
Here's an example of how to add the preview text slot to your email layout:
Defining a blank email layout
#If you're looking to create an email template in your workflow that doesn't use a layout to wrap the content of your email, you should select "No layout" in the "Email layout" dropdown within your email channel step's template settings.
Layouts and the visual template editor
#Regardless of the layout you've chosen for a given email step, you'll be able to use the visual template editor to compose the content of your email template.
When you use the visual template editor to insert components such as buttons and dividers into your email, Knock auto-generates CSS using a set of base component styles. You can find these styles in the section below, where we also cover updating these styles to match your design system.
Updating base component styles
#The components used in the visual template editor use the base component styles included below by default. These styles are auto-generated by Knock and injected into the top of <head> of your email layout at runtime.
If you want to override and modify these base component styles to match your design system, you can do so by adding them to the <head> of your layout file.
Keep in mind that to override any of the base component style properties listed below you'll need to include an !important tag to tell Knock to override the existing base styles that we'll inject into your template at runtime. As an example, if I wanted to update the font size of the block-button-sm component, I'd need to update its font-size property to font-size: 20px !important;.
Automate layout management with the Knock CLI
#In addition to working with layouts in the Knock dashboard, you can programmatically create and update layouts using the Knock CLI or our Management API.
If you manage your own email layout files within your application, you can automate the creation and management of Knock layouts so that they always reflect the state of the layout files you keep in your application code.
The Knock CLI can also be used to commit changes and promote them to production, which means you can automate Knock email layout management as part of your CI/CD workflow.
Layout files structure
#When email layouts are pulled from Knock, they are stored in directories named by their layout key.
layouts/
├── default/
│   ├── html_layout.html
│   ├── layout.json
│   └── text_layout.txt
└── custom-layout/
    ├── html_layout.html
    ├── layout.json
    └── text_layout.txt
If you're migrating your local layout files into Knock, you can arrange them using the example file structure above and then push them into Knock with a single command using knock layout push --all. Each layout.json file should follow the example shown below; additional information on the Layout structure is defined here.
You can learn more about automating layout management in the Knock CLI reference. Feel free to contact us if you have questions.