Webhook channel overview
Learn more about how to use Knock webhook channels to send to custom destinations, build reusable fetch steps, and to power customer-facing webhooks within your own product.
Learn more about how to use Knock webhook channels to send to custom destinations, build reusable fetch steps, and to power customer-facing webhooks within your own product.
Features and use cases
#You can use the Knock webhook channel type to build a custom channel that sends a webhook request to a configured endpoint. This endpoint can be static, or can be dynamically built using liquid variables during workflow run time. The Knock webhook channel supports , , , , and requests, making it a flexible tool to use for a number of different use cases.
You might use the Knock webhook channel to...
- Configure a custom channel (examples: PagerDuty, a proprietary in-house service) that you want to send a request to as part of your Knock workflow
- Codify commonly used fetch requests (such as fetching information about a user) for use across your different Knock workflows
- Build user-facing, configurable webhooks into your own product so your users can receive a webhook when something happens in your product
In this overview, we'll cover how to configure webhook channels in Knock and use them in your notification workflows.
Create and configure your webhook channel
#To create your webhook channel, go to the Knock dashboard and navigate to Channels and sources in your account settings. Click "Create channel," select the Webhook tab, choose Webhook, and click "Next."
Provide a name, key, and description for your webhook channel. You can also configure each environment's settings in this step, or later from the channel's page. Then click "Create channel."
Once your webhook channel has been created, you'll be able to manage its configuration on a per-environment basis. As with all Knock channels, webhooks can be used in sandbox mode and can be used with channel conditions.
You'll also need to build the actual webhook request that you want your webhook channel to send when it's triggered within a Knock workflow. We cover this topic in the next section.
Build your webhook request
#To start building your webhook request, navigate to your webhook channel and click "Edit webhook" on the environment you want to configure.
You'll now be looking at the webhook channel configuration page. You build a webhook request the same way you build a fetch function request: you define the endpoint, method, headers, params, and body payload, and you can use liquid in each of those fields.
To learn how to build a webhook request in detail, you can read our fetch function documentation.
Define request inputs
#A webhook channel's request configuration is shared by every workflow step that sends to it in that environment. Request inputs enable you to keep that configuration in one place while giving each workflow step the ability to pass its own values into it.
You define an input schema on the webhook channel's environment configuration. Each workflow step that sends to the channel then supplies values for those inputs, and Knock exposes the resolved values to the request template under the inputs namespace.
As an example, you might have a single webhook channel that posts to an internal events API, where each workflow step sets its own event_type and priority without overriding the rest of the request.
Define an input schema
#The input schema is a JSON Schema object that describes the inputs available to workflow steps: their names, types, descriptions, default values, and whether they're required.
To define one, navigate to your webhook channel, click "Edit webhook" on the environment you want to configure, then click "Define input schema" in the left pane of the configuration page.
Set input values on a workflow step
#When a webhook channel has an input schema, Knock renders a Request inputs field for each property on every workflow step that sends to that channel. You'll find these fields in two places: the step panel in the workflow builder, and the right pane of the step's template editor.
Each field accepts a static value or liquid, so you can reference workflow run state such as recipient, data, actor, and vars. As an example, you might set an order_id input to {{ data.order_id }} so each workflow run passes its own order.
Knock validates the values you enter against the schema when you save the step. Fields that contain liquid skip validation, since their values aren't known until the workflow runs. Properties that declare a default in the schema prefill their field until the step has values of its own.
Use inputs in your request template
#At send time, Knock renders the step's input values and merges them into the liquid scope for the request under inputs. You can reference them in the URL, headers, query parameters, and body like any other variable, alongside recipient, data, and vars.
If an input value fails to render, or the rendered values don't produce a JSON object, Knock fails the send with a rendering error that you can inspect in the workflow run logs.
Preview your inputs
#The request input preview section of the webhook channel configuration page renders a field for each property in your input schema. Values you enter there feed the cURL preview above them, so you can see the request Knock will build with inputs applied. These preview values are local to the page: Knock doesn't save them to the channel configuration and doesn't use them at runtime.
Use your webhook channel
#Once your webhook channel is configured and you've built its webhook request, you're ready to add your webhook channel to a workflow.
Webhook channels are added to Knock workflows the same way as any other channel. Just go to the Knock workflow builder and add your webhook step.
Overriding webhook configurations
#When you add your webhook channel to a workflow, the step uses the webhook request you built in your channel configuration. You can override this on a per-step basis.
A step that matches its channel configuration opens in a locked state. The request fields are read-only, and a callout tells you the step is using the channel-level configuration.
To change the request for a single step, click "Unlock" in that callout, or the lock button in the top right of the editor, and edit the fields. Saving your changes creates channel setting overrides on the step, replacing the default environment settings with your changes. Any modifications mean the entire template (URL, headers, params, and body) will be treated as an override. These overrides apply to all environments where the workflow is promoted.
A step with overrides shows a callout telling you it overrides the channel-level configuration. To reset the step to its channel default, click "Reset" in that callout.
Error handling and retries
#Knock treats any webhook channel response outside the 2xx range, along with connection errors and timeouts, as a failed send. Knock waits up to 50 seconds for a response before treating the request as a timeout.
Most failures are retried according to the retry logic documented here, for a maximum of 8 attempts. Webhook channel sends use a small list of statuses that indicate a request will never succeed; everything else is considered retryable.
Non-retryable responses
#Knock will not retry a webhook send when your endpoint responds with:
Knock also fails without retrying when it cannot build or issue the request at all.
These cases include a malformed URL, a URL that uses a scheme other than https,
and a hostname that does not resolve.
In each of these cases, the message's delivery status moves to undelivered after the first attempt. Read more about message delivery statuses here.
Retryable responses
#Every other failure is retried, including:
- Client errors.
4xx-status responses other than those listed above, most notably400 Bad Request,409 Conflict,422 Unprocessable Entity, and429 Too Many Requests. - Server errors. Any
5xxlevel HTTP status code. - Redirects. Any
3xxlevel HTTP status code. Knock does not follow redirects, so these responses are always treated as retryable failures. - Connection errors and timeouts. This includes any request that does not receive a response within 50 seconds.
Securing your webhooks
#The webhook channel offers request signing as a setting on the channel. When request signing is enabled, Knock will generate a signing key and use that to sign the request in a x-webhook-signature header that can be verified by the consumer.
Request signing is enabled per environment. On your webhook channel's page, click the environment you want to configure to expand its settings, then turn on Signature verification. The Signing key field appears once it's on.
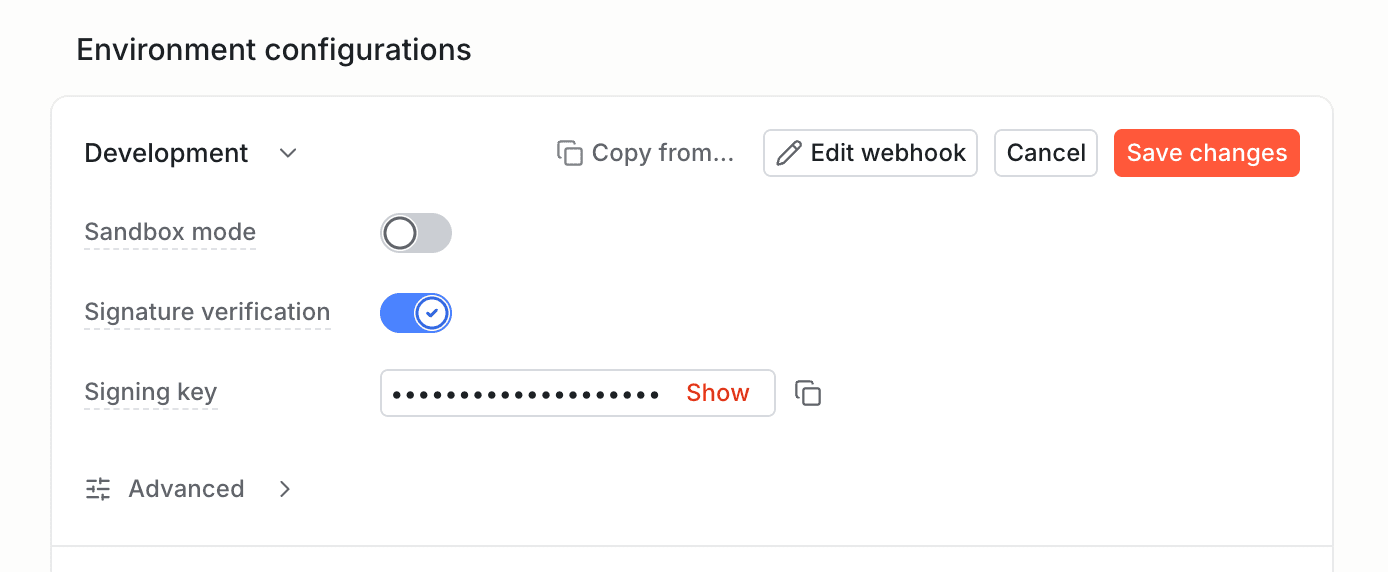
Once request signing is enabled, Knock will generate a signing key for you to verify the signature against. This key can be configured to be any value, or even a dynamic value resolved from the workflow run scope if necessary (see below for more).
Using a dynamic signing key
#In some cases, you may wish to use a dynamic signing key to verify your webhooks. For example, if you're using the webhook channel to power customer-configurable webhooks, you may want a different signing key per webhook configuration.
You can add a dynamic signing key by using liquid in the signing key input field. For example, if your signing key was stored on an object that represented the webhook you can reference the key as {{ recipient.webhook_signing_key }}.
Verifying the signature
#The signature is generated with an HMAC using the SHA256 algorithm and, before being encoded, is comprised of the timestamp and the stringified JSON payload of the request. We encode "timestamp in numerical form"."stringified payload" as the signature of the request.
The x-webhook-signature header is a string comprised of the timestamp used in the encoding and the encoded value above. It will look like this: t=timestamp,s=encoded-signature
To test that the payload sent has not been compromised, you can recreate the signature using the signing key found on the webhook channel configuration and compare it to the one sent in the header.
-
Split the
x-webhook-signatureon the comma (",") and extract the values of timestamp and signature. -
Construct the value of the signature by concatenating:
- The timestamp (as a string)
- The character
. - The stringified JSON payload
-
Generate the signature with an HMAC and SHA256 algorithm using the signing key from your webhook's channel configuration.
-
Compare your generated signature with the one extracted in step one; they should match exactly. If the timestamp is more than five minutes old compared to the current time, you may decide you want to reject the payload for additional security.